Your first paper project
Bookbinding for Beginners: Make a Simple Pamphlet Notebook
Start bookbinding with a notebook small enough to finish in one sitting. Fold six sheets, make three holes, and sew one length of thread through the spine. You get 24 writing pages without buying glue, building a press, or learning a complicated binding.
This is a three-hole pamphlet stitch: one group of folded sheets sewn into a flexible cover. It teaches you how a folded book holds together before you tackle hard covers or several sewn sections.
- Make
- One 24-page notebook
- Finished size
- 4¼ × 5½ in, or A6
- Plan for
- About an hour, at your pace
- Workspace
- A clear table and piercing pad
Allow extra time for measuring and learning the stitch. The two paper sizes below produce slightly different notebooks.
What you need for one notebook
Choose one paper size and use it for both the pages and the cover:
- US Letter option: six half-letter sheets, each 8½ × 5½ inches. Cut three full Letter sheets in half to get six. After folding, the notebook is 4¼ × 5½ inches.
- A-series option: six A5 sheets, each 210 × 148 mm. Cut three A4 sheets in half to get six. Fold each A5 sheet to make an A6 notebook, about 105 × 148 mm.
Six folded sheets make 12 leaves, with a front and back on each: 24 writing pages, excluding the cover.
| Item | Amount | What to choose |
|---|---|---|
| Page paper | 6 sheets | Ordinary writing or printer paper for a practice book; use one of the sizes above. |
| Cover | 1 sheet | Paper slightly heavier than the pages, in the same unfolded size. Avoid thick board. |
| Thread | About 60 cm / 24 in | Bookbinding linen, sturdy sewing thread, or embroidery floss that fits the needle and holes. |
| Sewing needle | 1 | A needle with an eye that accepts your thread and fits the prepared holes. |
| Piercing tool and support | 1 each | An awl with a handle, plus a suitable thick piercing pad or bookbinding cradle. |
| Basic stationery | Ruler, pencil, scissors | Use what you have. Two clips help keep the sheets aligned. |
A bone folder is optional for this project. A clean fingernail can crease thin paper. Waxed thread can be convenient, but waxing is optional too; Indiana University's notebook activity includes ordinary thread alternatives.
How much does starting actually cost?
If you already have suitable paper, a cover, thread, and safe tools, you can make this practice notebook without another purchase.
If you need equipment, separate reusable tools from materials used up. For a dated reference, Lineco displayed its Bookbinding Tool Kit, item 870-893 at US$49.60 on 5 November 2026. The listing includes awls, a folder, needles, thread, a brush, and beeswax. Paper and a cover are additional; shipping and tax can change the total.
The kit is optional and has not been tested for this guide. Check what is missing from your supplies before ordering anything, and compare the delivered price of individual tools with a kit.
Check the paper before you fold it
Paper has a grain direction. For a book, aim to have that grain run parallel to the spine, along the fold. The pages turn more comfortably and the fold meets less resistance. The University of Utah's book-arts definition of grain direction explains why this matters.
Before creasing a sheet, gently curve it one way, then the other. Compare how much it resists. Orient the paper so the eventual spine fold bends in the easier direction. Try this with a scrap first if the difference is hard to feel. Do not assume every pack of printer paper has the same grain orientation.
For a first practice book, use the paper you have rather than throwing it away over an uncertain grain test. Just notice whether the pages resist opening. If a stiff cover cracks at the fold, try a lighter cover instead of pressing harder.
Make your first notebook
1. Fold the pages and cover
Bring the two short edges of each sheet together so the corners meet. Crease each sheet, then nest the folded sheets inside one another. Fold the cover separately and put it around the outside. This nested section is called a signature.
Tap the head and tail of the stack against the table to line up the sheets. Open to the middle and check that the cover fold sits directly underneath the page folds. Clip near the outer edges, clear of the spine. Each sewing hole needs to pass through every sheet and the cover.
2. Mark three sewing holes
On a scrap strip the same height as your notebook, mark the midpoint, then a point about 2 cm / ¾ inch from each end. Label the top point A, the middle B, and the bottom C.
Place this strip along the centre fold. The top and bottom marks should be equally far from their respective ends; the middle mark belongs halfway down the spine. Keep the strip to make another notebook with the same spacing.
3. Pierce through the fold
Make a small hole at each mark, from inside the open fold through to the outside. Use only enough pressure to pass through. Then check that all three holes reach the cover and every page. The needle should pass without a struggle, but the holes should not be large slots.
If the stack is too difficult to pierce comfortably, stop. Use the same marked strip to pierce smaller groups on the support, then realign and clip them. Do not compensate by pushing harder toward your hand.
4. Prepare the thread
Cut about 60 cm / 24 inches for either small notebook size in this guide. Thread the needle without knotting the far end. Leave roughly 7–8 cm / 3 inches inside when you make the first stitch; you will tie that tail to the working end later.
Keep the book open at the middle throughout sewing. In the next steps, inside means this open centre spread; outside means the back of the cover at the spine.
5. Sew B → A → C → B
Start at the middle from the inside. The route matches the University of Utah's three-hole pamphlet stitch; this version puts the finishing knot inside.
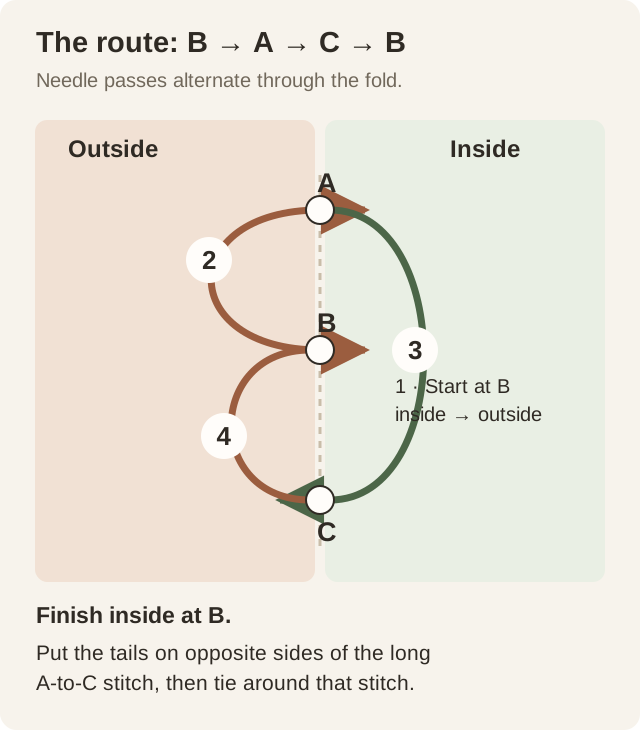
| Pass | Through the hole | Then move |
|---|---|---|
| 1 · B | Inside → outside | Leave the short tail inside; take the working thread up the outside to A. |
| 2 · A | Outside → inside | Cross the inside all the way down to C. Skip B. |
| 3 · C | Inside → outside | Take the working thread up the outside to B. |
| 4 · B | Outside → inside | Bring the needle out on the opposite side of the long A-to-C stitch from the starting tail. |
Pull slack through gradually after each pass. The thread should sit against the fold without cutting into it. On the final return through B, pass beside the existing thread rather than through its fibres.
6. Tie around the long stitch
You should now have two loose ends inside, with the long A-to-C stitch between them. If both ends are on one side, take one end under that long stitch before tying.
Make a square knot around the long stitch: cross right over left and tuck, then left over right and tuck. Draw it snug without crushing the fold. Leave short tails, about 1 cm / ⅜ inch, when trimming. Do not cut flush with the knot.
Close the notebook, open it again, and turn through the leaves. Look for a sheet the stitching missed, a loop standing away from the spine, or a hole beginning to tear. Adjust before you start filling the pages.
7. Leave the fore-edge alone for now
The inner leaves may project a little farther than the outer ones. That is page creep: nested folds take up space. A slightly stepped edge is fine on a practice notebook.
Keep this first project free of knife trimming. Cutting a thick stack accurately needs suitable cutting equipment and technique. For a tidier second notebook, use fewer sheets or thinner paper. Add a date and a title to the cover, and put the book to use.
When something looks wrong
| Problem | Check | What to try |
|---|---|---|
| A page slips out | The holes may have missed one folded sheet. | Unthread the book, realign the folds, and check every sheet against the same template. |
| Loose loops at the spine | Slack may be trapped between holes. | Before tying, work the slack through each span in order. Do not yank only at the ends. |
| The fold tears | Too much tension, oversized holes, or damaged paper. | Stop tightening. Replace the damaged sheet and resew more gently. |
| The needle will not pass | Misaligned holes or thread too large for the hole. | Check alignment first. Use thread and a needle suited to the prepared holes rather than forcing them. |
| The knot slides along the spine | It may not enclose the long centre stitch. | Untie it and place the ends on opposite sides of that stitch before making the square knot. |
| The book springs open | Too many thick sheets, a stiff cover, or a resistant fold. | Try fewer sheets and a lighter cover. Check grain before preparing the next book. |
What to change on your second book
Change one thing so you can see what it does. Try a different cover paper, use thread in a contrasting colour, or reduce the signature to four sheets for a slimmer 16-page notebook. Test your pen on a scrap of the page paper before making a book specifically for fountain pens or wet media.
Make another small signature before attempting a thick journal. Adding more and more sheets changes how the book folds; it does not turn this stitch into a multi-section binding.
If you want another project that fits the same workspace, compare hobbies you can do at home. For a different inexpensive making activity, our soap-carving beginner guide walks through a small sculpture.
Beginner questions
Do I need glue?
No. In this project the thread joins the folded pages and cover. Glue belongs to other structures or optional decoration; it is not needed to make this binding hold together.
Can I use printer paper?
Yes, for a practice notebook. Check how it folds and how your pen behaves on it. Paper intended for drawing or wet media is a separate choice, and thicker sheets may require a smaller signature.
Why do six sheets make 24 pages?
Each sheet folded once creates two leaves. Each leaf has two writable sides. That gives four pages per sheet, so six sheets make 24 pages, excluding the cover.
What is the easiest first binding?
A three-hole pamphlet stitch is a manageable starting point because you sew one folded section through three holes. It lets you practise alignment and tension before adding the complications of several sections or a hard cover.
Technique references
The stitch was checked against university book-arts instructions. Project dimensions and troubleshooting are explained for the small notebook specified here.
- University of Illinois conservation lab: pamphlet binding activity — folding, piercing, and an inside-start stitch demonstration.
- University of Utah Book Arts Program: pamphlet stitch lesson — hole order and tying around the centre thread.
- Indiana University: make a science notebook — thread alternatives and a version with the knot outside.
- University of Utah: grain direction — paper behaviour and alignment with the spine.