Your first quilling project
Paper Quilling for Beginners: Make Your First Flower Card
Roll a narrow paper strip, let it open into a small coil, then pinch one side. That teardrop is a flower petal. Make five, add a centre and two leaves, and you have the pieces for your first quilled greeting card.
Paper quilling, also called paper filigree, uses rolled and shaped strips to build designs. This project keeps the design small so you can practise the parts that matter: even coils, deliberate pinches, and small amounts of glue.
- Make
- One flower greeting card
- Pieces
- 5 petals, 1 centre, 2 leaves
- Paper width
- 3 mm, approximately ⅛ inch
- Plan for
- Set aside an hour, plus drying
This is a planning estimate, not a timed test. Allow extra time for practice coils. Strip lengths and target diameters below are a starting specification; paper weight and rolling tension affect the result.
This researched guide uses the technique references linked below. The layout is an illustration, and the dimensions are suggested starting points rather than a physically tested pattern. Make a practice coil before cutting the full set.
What you need
- Quilling strips about 3 mm wide: one petal colour, one centre colour, and green for the leaves. Have a few extra strips for practice.
- A slotted quilling tool: its split tip holds the beginning of the strip while you roll.
- Paper-compatible liquid craft glue that dries clear: use a small amount on scrap card and apply it with a toothpick.
- A blank greeting card: A6 or a similar small size works for this layout. Choose a firm, uncoated card front.
- Ruler, scissors, pencil, and a green pen: the stem is drawn, so you can focus on shaping the coils.
- A coil-size reference: a circle template board is helpful; the printable sizing sheet below gives a flat comparison guide.
Tweezers help place small pieces but are optional. Cover your working surface, keep tool tips and scissors stored safely, and follow the adhesive's label. There is no need for a hot-glue gun for this project.
Slotted tool or needle tool?
| Tool | How it starts a coil | For this card |
|---|---|---|
| Slotted tool | Insert the very end of the strip into the slot and turn the handle. | The easier starting choice because the slot holds the paper for you. |
| Needle tool | Wrap the beginning around the plain shaft and hold it with your fingertips as you roll. | An optional later experiment; keeping the beginning in place takes more coordination. |
Quilling.com's beginner FAQ describes how the slotted tool catches the strip. Buy one basic tool before adding specialised combs, crimpers, or electric rollers.
Choose paper that will roll
Use ordinary quilling paper for the coils and heavier card for the backing. The Quilled Creations FAQ recommends text-weight paper and explains that cardstock tends to bend rather than roll. Keep all the petal strips from the same paper pack so their thickness and behaviour are as similar as possible.
Premade strips save you cutting several narrow, even widths. You can practise with hand-cut paper, but uneven strip edges make it harder to tell whether the problem is your rolling or the paper.
What to budget for
As one US-dollar price reference, the Quilled Creations slotted tool, SKU 301, was listed at $5.00 on 11 November 2026, before shipping and tax. Paper strips, glue and the card blank cost extra. This is a supplier listing, not a product we tested; check the current price and availability before ordering.
Check your stationery drawer before buying a kit. You may already have suitable glue, scissors, a ruler and card. Compare the complete delivered cost of the supplies you actually lack rather than the price of a tool alone.
Cut the pieces and choose your coil sizes
Cut all five petal strips to the same length before rolling. The flower uses eight pieces; the stem will be a pen line.
| Part | Strips | Starting size and shape |
|---|---|---|
| Petals | 5 × 200 mm / about 8 in | Release each to a 12 mm round coil, close the end, then pinch one point. |
| Centre | 1 × 100 mm / about 4 in | Keep as a tight round coil. Its exact diameter depends on the paper and tool. |
| Leaves | 2 × 150 mm / about 6 in | Release each to a 10 mm round coil, close the end, then pinch two opposite points. |
The 12 mm and 10 mm measurements describe the round coils before pinching. A finished teardrop or marquise will have a different width and length. Use the millimetre measurements consistently if you are cutting from a ruler; the inch equivalents are rounded.
Make a practice petal first. If that paper cannot comfortably relax to 12 mm, use a nearby size it reaches naturally and repeat that size for all five petals. Do the same for the two leaves. Consistency across the set matters more than forcing a coil to hit a number.
Print a coil-size reference
Download the coil sizing sheet. It includes five 12 mm circles, two 10 mm circles, and a 50 mm calibration line.
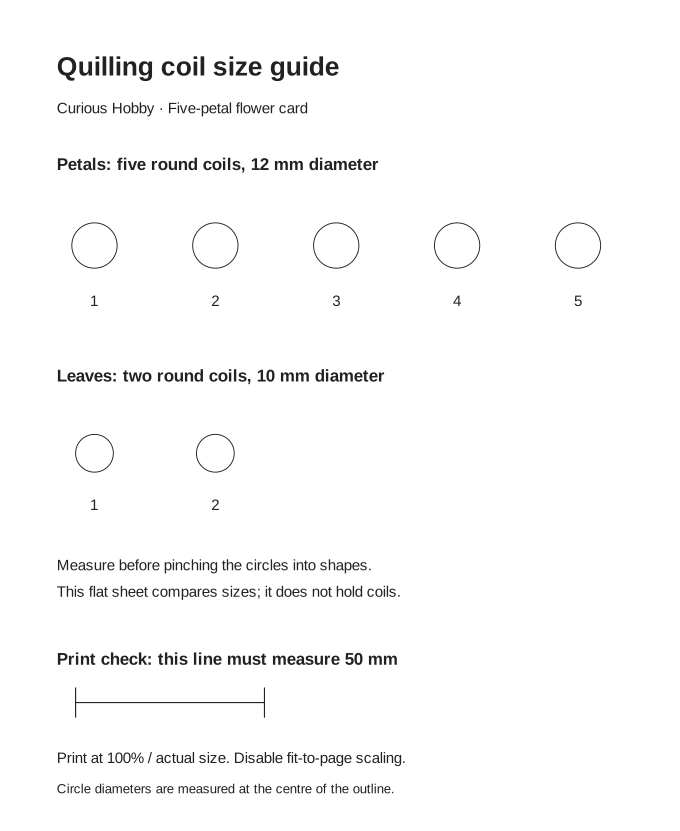
Print the downloaded SVG at 100% or actual size, then measure the line with a ruler. If it does not measure 50 mm, adjust the print settings before using the circles. Screen size and a printer's “fit to page” setting can change the scale.
The printed circles let you compare diameters; they do not restrain an unrolling coil like holes in a template board. Keep glue off the sheet. Cecelia Louie's circle-template tutorial explains how tension and paper weight affect sizing.
Make the flower card
1. Practise one loose coil
Slip only the very end of a petal strip into the tool's slot. Keep the paper edge aligned as you turn the handle, guiding the loose strip with your other hand. Aim for even tension rather than squeezing the roll tightly.
Following Cecelia Louie’s coil-release advice, gently push the coil off the tool rather than pulling the outer layers away. Let it expand on the work surface, controlling it with your fingertips or a circle template. Compare its diameter with the 12 mm reference. If the layers will not open, try rolling the next practice strip with less tension.
2. Close the coil with a small dot of glue
Let the coil reach the size you want before securing its outer end. Use the tip of a toothpick to put a small dot on the last few millimetres of the strip, then press that end against the outer coil until it holds.
The aim is to join the tail to the next layer. Keep glue away from the open spiral. If a blob squeezes out, use less on the next piece. Make a scrap-paper test with your chosen adhesive before working on the card.
3. Pinch five teardrop petals
Once the seam holds, pinch one side of the coil between your fingertips to make a point. Leave the opposite side rounded. Pinching at the glued end helps place the seam at the narrow base.
Repeat for the remaining four petals, checking each round coil against the same reference before shaping it. Set the five teardrops beside one another. Remake an obvious outlier now, while the flower is still loose on the table.
4. Make the centre and two leaves
Roll the centre strip and keep it compact as you remove it from the tool. Secure its outer end with a tiny dot of glue. Do not let this one expand to the petal size.
For each leaf, make a loose round coil using the 10 mm reference and glue the end. Pinch one point, then pinch the opposite side. The resulting pointed oval is a marquise. The Appleton Museum’s shape instructions show the same distinction: one pinch for a teardrop, two opposite pinches for a marquise. Keep the two tips roughly opposite so the leaf does not curl into a crescent.
5. Arrange the flower before gluing
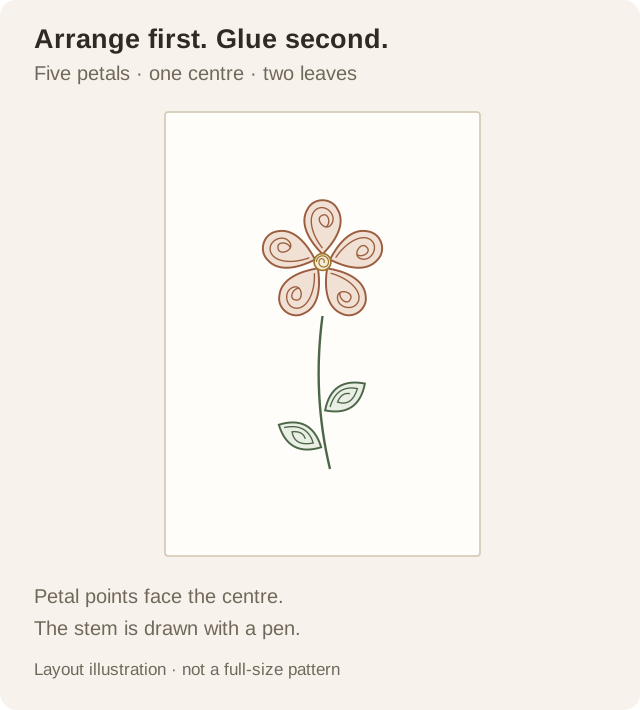
Write your greeting inside the card first, while its front is still flat. On the outside, choose a flower position in the upper half and place the tight centre there without glue. Arrange the five petals around it with their pointed ends facing inward.
Turn the petals until the gaps look balanced. Leave enough space below for a stem and two leaves. A design that looks slightly different from the illustration is fine; use the actual pieces to decide where everything fits.
6. Draw the stem and attach the pieces
Lift the flower away, keeping track of its position. Draw a thin green stem down from just below the bloom, and let the ink dry before adding nearby glue.
Lift one paper shape at a time. Use a toothpick to spread a thin film of glue across the bottom edges that will touch the card. Place it back, press lightly enough to make contact, and leave it alone. Work through the petals, centre, and leaves. Angle the leaves toward the stem with one point close to the line.
Keep the top edges and open coils clean. If you need to reposition a piece, do it while your adhesive still allows adjustment; dragging a partly set coil can leave a mark.
7. Let it dry flat, then protect the relief
Leave the card face-up on a flat surface. Follow the glue manufacturer's drying instructions and allow extra time if the card or joins still feel damp. A set seam is not necessarily ready for handling or posting.
Keep heavy objects off the raised design. Once dry, store it in a box with headroom above the coils. For posting, choose protective packaging that keeps the quilling from being compressed, and check the postal service's size and thickness requirements.
Fix the common beginner problems
| Problem | Likely issue | What to try |
|---|---|---|
| Petals are different sizes | Unequal strip lengths, tension, or release sizes. | Cut one batch of equal strips and check every round coil against the same circle before pinching. |
| A coil will not relax | The roll may be too tight; see the supplier’s tension advice. | Try a practice strip with lighter, steadier tension. Do not prise apart glued layers. |
| Paper forms a little cone | The strip edges were not kept level. | Practise guiding the strip square to the tool and keeping each turn aligned with the previous turn. |
| The outer end springs open | The glue seam has not set or missed its contact point. | Use a small fresh dot on the tail and hold the seam together until it grips. |
| Glue marks the card | Too much adhesive or too much moving after placement. | Test a thinner application on scrap card; arrange the dry pieces before gluing. |
| The card curls | A light backing or excess moisture. | Use a firmer card and less glue next time. Do not press the finished relief under a heavy book. |
For your second card, change one thing: the petal colour, the number of flowers, or the placement of a short greeting. Keep the same strip width and coil sizes until rolling feels predictable. If you want a different table-sized activity afterward, compare other hobbies you can do at home.
Beginner questions
What width of quilling paper should I start with?
Use about 3 mm, commonly sold as ⅛ inch. It is a common general-purpose width and suits this small card. Keep the width consistent across the coils.
Can I make quilling strips from printer paper?
You can use hand-cut strips for practice. Measure the width carefully and cut straight edges. Premade strips give you a more consistent starting material when you are learning to control coils.
Do I need a circle template board?
It is helpful for holding coils at a chosen diameter. A printed circle is a visual reference only. If you work without a board, control the coil gently with your fingertips and compare it with the same reference each time.
Can I put the card in an ordinary envelope?
The raised coils can be crushed in tight or unprotected packaging. Use enough clearance and protection for the relief, and check the relevant postal requirements if you plan to mail it.
Technique and materials references
- Quilled Creations: quilling FAQ — paper, tension, sizing, and glue considerations.
- Quilling.com: beginner FAQ — common strip width and starting a roll with a slotted tool.
- Cecelia Louie: circle templates and teardrops — controlling coil size and shaping a teardrop.
- Appleton Museum: paper quilling handout — tight coils, teardrops, marquise shapes and attaching coils.