Your first cubing practice session
Speedcubing for Beginners: From a First Solve to Useful Practice
First, learn to solve a 3×3 cube without help. Then time a small set of attempts, notice where you hesitate, and practise that part. You’ll get more useful information from one honest session than from repeatedly chasing a lucky personal best.
This guide gives you a route to your first solve, the notation you’ll meet in tutorials, and a practice plan you can reuse. It doesn’t promise a particular time after a week.
- Start with
- One normal 3×3 cube
- First goal
- A complete solve you understand
- Next goal
- Five recorded attempts and one useful observation
- Extra equipment
- A browser timer or stopwatch, plus notes
Do you need to learn the solution or improve your practice?
- You’ve never finished a cube: follow the first-solve route with the timer off. Looking at instructions is part of learning.
- You can solve it, but still need reminders: keep the same method and identify the step you forget. Separate these assisted solves from your timed baseline.
- You can finish independently: move to the five-attempt baseline and choose one thing to practise.
Speedcubing means solving twisty puzzles against the clock. You can enjoy it at home without entering a competition. This guide focuses on the ordinary two-handed 3×3, so you can keep the puzzle and method consistent while learning.
What you need, and what can wait
Use the cube you already own if its layers turn comfortably and you can tell the colours apart. You need a stable surface, somewhere to record results, and a timer. A dedicated competition timer, smart cube and collection of accessories can wait.
If you need a cube, one dated US-dollar reference is the MoYu RS3 M 2020 listing at TheCubicle: the standard magnetic version was displayed at US$8.99 on 16 November 2026. Upgraded versions cost more. Tax, shipping, stock and the selected option can change the delivered cost.
That is a retailer price example, not a cube we tested or a claim that it is the best model. Start with comfortable turning rather than assuming a more expensive puzzle will solve a pause in your method.
Keep turns light. If a layer catches, align it before trying again instead of forcing it. Take a break when your grip becomes tense or uncomfortable.
Read a move without guessing the direction
Hold the cube still relative to you. The face toward you is F for front; the others are Back, Right, Left, Up and Down. These letters refer to positions, not permanent colours.
In J Perm’s notation guide, a plain letter means a clockwise quarter-turn as though you were looking straight at that face. An apostrophe, called a prime, reverses it. A 2 means a half-turn.
| Move | Read it as | What turns |
|---|---|---|
R | Right | The right outer face, clockwise when viewed from the right. |
U' | Up prime | The top outer face, counterclockwise when viewed from above. |
F2 | Front two | The front outer face through 180 degrees. |
Try a reversible check on a solved cube: do R, then R'. You should return to the starting state. Do U2 twice for another check. If it doesn’t come back, slow down and check which face you turned. An algorithm is simply a sequence of moves; these checks are not a complete solving algorithm.
Follow one complete beginner method
Open the official Rubik’s 3×3 solve guide and keep its cube orientation as you work. It includes diagrams and a downloadable solution. Stay with that one route for a full solve before mixing in algorithms from another tutorial.
Before you begin, find a centre, an edge with two colours, and a corner with three. The centre tells you the colour of that face. When you finish a cross or layer, check the adjoining side colours as well: a solid white face can still have its pieces in the wrong places.
Work through a section, check its stated outcome, then pause. If a later step appears to undo earlier work, first check the required orientation and complete that section’s instructions. Random extra turns make it harder to locate the mistake.
You’re ready for an independent attempt when you can explain what each stage is trying to achieve. It’s fine to keep learning with the guide open until then. Your first success is completing the cube, not beating a stopwatch.
Record five attempts you can compare
Set up a practice timer
csTimer’s own help page explains its scrambles, sessions and statistics. Choose a standard 3×3 scramble type and make a separate session for this method. Test the controls before using a solve as data: on a keyboard, hold Space until the timer is ready, release to start, and press a key to stop.
- Begin from a solved cube and apply the displayed scramble carefully. Keep the cube orientation consistent while reading it. If you lose your place, return to a known solved state and start again.
- Choose and record an inspection policy. Inspection is the look at the scrambled cube before timing the solve. Keep the same policy across sets; unlimited planning and a short inspection are different conditions.
- Start the timer, solve without a reference, then stop it after the cube is finished. Check all faces before recording the result.
- Keep all five attempts. In this practice log, mark an abandoned or assisted timed attempt DNF—did not finish—and note why. Don’t quietly delete a difficult scramble to improve the average.
Assisted learning solves belong in separate notes. A browser or manually operated stopwatch gives you practice results; it does not turn them into official competition results. Use the timer’s export function or save your notes so your history survives a browser reset.
For standard WCA speed-solving practice, inspection is strictly under 15 seconds without an inspection penalty. The WCA inspection and start rules explain penalties and procedures. Read those before practising competition conditions; special formats can differ.
What does an average of five mean?
The WCA Average of 5 format removes the best and worst attempts, then averages the remaining three. With one DNF, that result can be removed as the worst; with two or more DNFs, the average is DNF.
Illustrative numbers, not our results: for 72, 68, 80, 70 and 75 seconds, remove 68 and 80. The remaining average is (72 + 70 + 75) ÷ 3 = 72.33 seconds, rounded to hundredths. Keep all five original entries so you can see what produced the number.
A personal best tells you about one attempt. An average helps describe a set, but one set still doesn’t establish a trend. Compare several sessions under similar conditions and read the notes alongside the times.
Find the pause before trying to turn faster
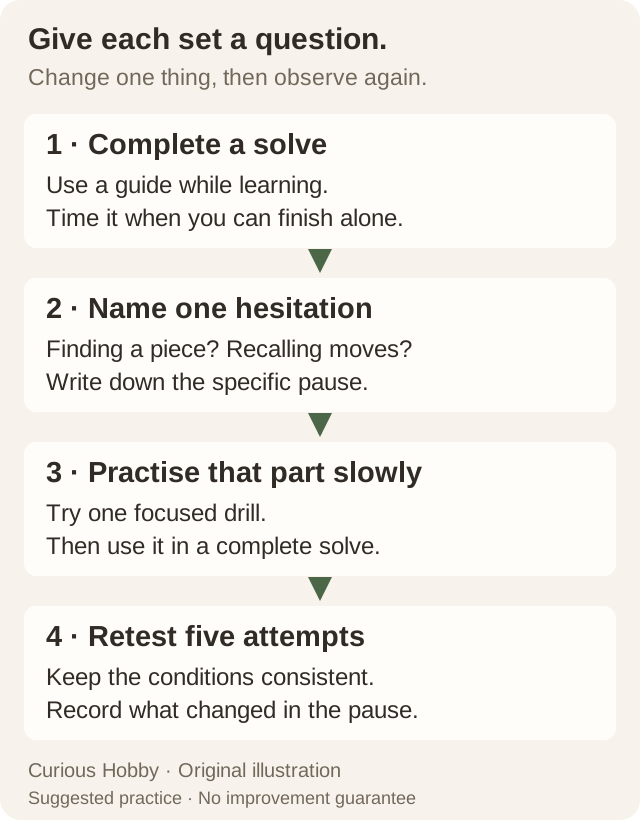
Do one slow, untimed solve and name the reason each time you stop. Are you finding a piece, remembering moves, choosing the right case, or regripping? “I pause before the middle-layer edge” is a more useful note than “I’m slow.”
Feliks Zemdegs’s CubeSkills practice advice distinguishes comfortable finger tricks, reliable algorithms and focused work from simply accumulating solves. Try one small intervention:
- You forget a sequence: return to its lesson and practise the known sequence accurately, with the correct starting orientation.
- You can’t find the next piece: slow down and locate it before turning. At first, deliberate pauses are useful for understanding.
- You know the moves but keep changing grip: use the instructor’s finger-trick lesson for that sequence, then try it slowly in a complete solve.
Finish with another small timed set when you can solve independently. Write whether the specific pause changed, even if the total time didn’t improve.
A seven-session plan you can repeat
These are suggested exercises, not a tested training dose or a seven-day deadline. Repeat a session when it is still useful. If you need instructions to finish, stay with the learning sessions rather than forcing a timed set.
| Session | Focus | Record |
|---|---|---|
| 1 · Complete | Follow one beginner method all the way through. Check the sides of each solved layer. | The stage that still needs a reference. |
| 2 · Baseline | Check notation, then record five independent attempts if ready. | All five results, inspection policy and method. |
| 3 · First step | Before moving, identify one cross edge and its destination. Repeat on several scrambles. | Which piece was hard to locate. |
| 4 · Piece finding | Do a slow solve, stopping to identify the next piece before turning. | One repeated search or unnecessary rotation. |
| 5 · Recall | Revisit one familiar sequence that causes mistakes, then use it in a full solve. | The case or orientation that confused you. |
| 6 · Comfortable turns | Watch one relevant finger-trick lesson and practise that movement slowly. | A grip change you can avoid without straining. |
| 7 · Retest | Record another five attempts under the baseline conditions. | The average and what changed in your chosen pause. |
Download the blank seven-session practice log. Enter times in seconds, or DNF where appropriate. The CSV records your data; it doesn’t calculate averages. It contains no sample performance results.
When should you try finger tricks or CFOP?
Finger tricks are ways of turning layers with your fingers while reducing unnecessary grip changes. Use J Perm’s finger-trick lesson for demonstrations. Start with movements you already understand, rather than adding fast execution to an uncertain sequence.
CFOP stands for Cross, First Two Layers, Orientation and Permutation. It builds the first two layers with corner-edge pairs, then orients and places the last-layer pieces. J Perm’s CFOP introduction explains the stages and simpler last-layer approaches.
You don’t need to memorise every advanced algorithm before practising. Pick one next lesson that addresses your actual difficulty. CubeSkills also offers lessons for improving the beginner method if you want to stay with it. New techniques can initially slow a solve while you learn them; that is a reason to label a method change in the log, not hide the slower attempts.
If the puzzle format doesn’t suit you, compare other hobbies you can do at home. Changing activities is fine; you don’t owe the cube a particular finishing time.
How this guide was prepared
Curious Hobby used AI assistance to research, draft and illustrate this guide, checking technical statements against the original teaching resources and current WCA rules linked above. The plan and blank log are editorial practice aids. We have not tested this routine, reviewed the cube hands-on, or recorded improvement results. The numerical example explains arithmetic only.