Your first wool project
Needle Felting for Beginners: Make a Firm Wool Ball
Start with one plain wool ball. You’ll learn how to keep the needle moving straight, turn the work, and tell a loose bundle from a shape that holds together. Leave the tiny animal legs for another day.
Needle felting uses a special notched needle, often called a barbed needle, to tangle wool fibres together. It doesn’t sew a seam. For this small practice piece, you won’t need water, glue or a wire frame.
- Make
- One rounded practice shape
- Suggested scale
- About 3 cm across; exact size isn’t important
- Workspace
- A felting mat on a stable table
- Main skill
- Build density while keeping the needle straight
This is a research-based tutorial with original explanatory diagrams. The supply allowance and size are starting suggestions, not results from a physical test.
What you actually need
- Carded wool suitable for needle felting. A small 10 g bundle gives you material to practise with and add gradually. That’s a supply allowance, not an instruction to pack all 10 g into one ball.
- One felting needle in a compatible holder, plus a spare. A 36-gauge triangular needle is a practical shaping choice; a 38-star is an alternative all-rounder. Buy needles labelled for needle felting, not ordinary sewing needles.
- A purpose-made felting surface. Choose a dense foam, wool or brush mat intended for the tool you’re using. It needs room and depth for your work without letting the needle strike the tabletop.
- Finger protectors and a covered needle container. Follow their instructions and keep your fingers outside the needle’s path even when wearing guards.
- Optional: a fine finishing needle and a wisp of contrasting wool for one colour patch.
Which wool should a beginner buy?
Look for carded wool or core wool sold for needle felting. Carded wool has fibres going in different directions, which makes it a useful starting material. The Felt Box’s wool and starter-equipment guide explains these options. You can use one colour throughout; a separate decorative outer layer is optional.
“Core” describes its job inside the shape, rather than a requirement to buy a second product. If a kit includes suitable coloured carded wool, practise with that first. Save a smooth, detailed animal finish for after you can make a stable core.
Do you need a whole set of needles?
No. Start with one shaping needle and a spare. A finer needle can help with surface work later. In the supplier’s gauge guide, 36 triangular is for building shapes and 40 triangular is for finishing; the higher number means a finer needle. Don’t assume coloured handles or painted ends mean the same gauge across brands.
A dated starter-cost example
On 12 November 2026, the UK supplier The Felt Box listed its small starter kit at £16.97 GBP, tax included. The listing includes 100 g of carded wool, five needles, a foam mat, a holder, finger protectors and instructions. Shipping is extra; check the selected variant and availability before ordering.
That’s a price reference, not a tested recommendation or a US delivered price. Compare a kit with the complete cost of buying only what you lack, including a suitable mat and safe storage. A cheap bag of wool alone isn’t the full setup.
Set up so the needle has a clear path
Put the mat on a stable, well-lit table. Work over its central area, with space to put down the capped tool. Keep children and pets away from the work area. Woolbuddy’s needle safety checklist stresses sharp tips, a suitable working surface, clear fingers and enclosed storage.
Keep the project on the mat, not in your lap or balanced on a fingertip. If you need a finger to steady it, hold the side well clear of where the point enters and could emerge. Stop if you can’t keep that clearance. Finger guards are a reason to be more deliberate, not to put a finger beneath the needle.
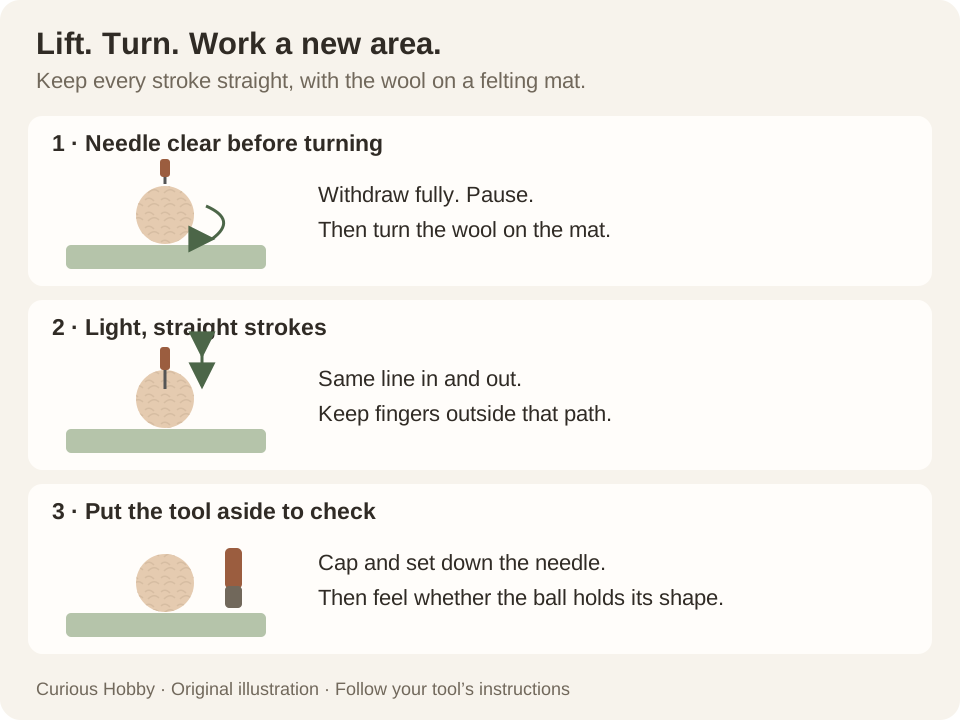
Use light, controlled strokes. For this first shape, work vertically down into the top of the wool and withdraw on the same line. Take the needle completely out before turning the wool. Artist Stephanie Metz’s explanation of needle breakage shows why sideways pressure and collisions with hard objects cause problems.
Read your particular holder’s instructions before fitting a needle. Clover’s pen-tool instructions, for example, say to punch lightly, avoid the edge and bottom of the mat, and never withdraw at a different angle. The mounting and cap details are specific to that tool.
Make your first wool ball
1. Fold a small tuft into a compact bundle
With the needle capped and set aside, pull off a small tuft. Fold the loose edges inward and roll it into a compact, rounded bundle between your fingers. Put the unused wool aside. You’re starting a core, not trying to make the full-sized ball in one go.
Clover’s beginner tips recommend pulling wool apart by hand and starting with less. This leaves soft edges that you can blend into the next layer.
2. Secure the folds on the mat
Place the bundle on the mat and arrange your steadying fingers clear of the needle path. Make a few light strokes into the loose fold, then fully withdraw the needle. Pause, put the tool safely down and see whether the bundle still unrolls.
If it does, refold the loose edge and work that area again. Don’t chase a rolling ball with a moving needle. Stop and reposition it first. Living Felt’s needle-use FAQ describes a light, straight motion rather than forceful jabbing.
3. Work around the core
Turn the bundle between short sets of strokes, always with the needle fully out. Present a new area at the top and work into it. Keep changing the face you’re working on so one side doesn’t become a flat disc.
At this stage, the aim is to join the bundle into one piece. Let the needle’s working tip engage the wool, without pushing it through the opposite side or into the table. There’s no universal insertion depth: the wool, needle and mat all matter. If you meet hard resistance, stop rather than push harder.
4. Add one thin layer at a time
When the core holds together, set down the capped tool and wrap a thin veil of wool around it. Fold in the loose ends. Return it to the mat and felt the new layer into place, turning between sets of strokes.
Repeat only when that layer is secure. Ashford’s introductory felting instructions use small additions and work on different sides to build a shape. For this ball, keep the additions modest: a thick fluffy blanket makes it harder to notice a loose core underneath.
5. Pause and check before decorating
Use the checks below with the needle capped and put aside. If the ball still folds in on itself, return to small areas of the existing shape before adding more wool. A slightly uneven but cohesive ball is a useful first result; it doesn’t have to look polished.
6. Add a small colour patch, if you want one
Lay a fine wisp of a second colour over part of the firm core. Attach its middle with a few light strokes, then work out toward the edges, turning the ball to keep the active area on top. Add another wisp only if you want more coverage.
A finer finishing needle is useful here. Keep the strokes light and shallow enough to work the surface layer rather than forcing long strokes into an already firm centre. Skip this step if you’re still learning to keep the core together.
How do you know it’s firm enough?
Think about what the ball does, rather than how long you’ve been working. WSFAS’s core-building lesson uses a gentle squeeze and the amount of movement in the wool to judge progress. With your tool safely aside, check:
- It stays together off the mat. The original fold doesn’t spring open.
- A gentle squeeze doesn’t collapse the middle. Some give is fine; a loose cotton-ball centre needs more work.
- Added layers belong to the shape. A loose flap needs attaching before another layer goes over it.
A few fuzzy fibres don’t mean the core has failed. Separate “is it holding together?” from “is the surface smooth?” Stop building when the form is stable. Don’t keep driving a coarse needle into resistant wool just to erase every visible hole.
When the ball isn’t behaving
| What you notice | What to check | Next move |
|---|---|---|
| The middle stays squishy | A loose starting bundle or too much wool added at once. | Work the existing core evenly before adding another layer. For a second attempt, start smaller and wrap more compactly. |
| One side is flat | The same face has stayed on the mat. | Withdraw, turn and work the raised areas. Add a thin wisp to a low area only if needed. |
| The colour patch peels up | The layer is too thick or only its middle is attached. | Use a thinner wisp and secure its edges in small sections. |
| The needle catches or bends | Sideways movement, dense wool or contact with something hard. | Stop. Withdraw without levering it; check the tool and support. Replace a damaged needle and reassess your stroke. |
| The surface has large holes | The shaping needle is still being used for finishing. | Try a finer needle with light surface strokes after the core is firm. |
There’s no useful guaranteed finishing time. Take breaks before your attention or grip becomes strained. You can put the project away and resume another day.
If a needle breaks, stop and account for it
Keep the work and mat separate from other craft materials. Look for the broken section without running your fingers through the wool or over the mat. Use a suitable tool, such as tweezers, to pick up visible fragments; don’t try to straighten or reuse a broken needle.
Brilliant Labs’ felting safety notes require proper disposal of broken pieces. Keep recovered fragments in a rigid closed container while you check local sharps-disposal guidance. If you can’t account for a piece, stop using the project and contain it securely; don’t give it to someone else.
At the end of every session, account for the needles you took out, cap or enclose them, and put them out of reach of children and pets. Only then clear loose fibres from the mat and table. Treat this first ball as a craft practice piece, not a child’s or pet’s toy.
Choose one change for your next project
Try another ball using the same wool and compare how the core feels. Or add one small colour patch to your first firm shape. Keeping most of the setup the same makes it easier to notice what changed.
If you’d rather work with paper and glue, our first quilled flower card gives you a different small-table project. To compare workspace and tool needs before choosing another hobby, browse hobbies you can do at home.
How this guide was prepared
Curious Hobby used AI assistance to research, draft and illustrate this guide, checking the technique and safety statements against the maker instructions linked in the text. It is not a hands-on product review. The diagrams explain the movement; they don’t show a ball or tool we physically tested.
The sources describe different projects and tools. Follow the instructions supplied with your particular needles, holder and mat. The plain ball and its suggested scale keep this first exercise focused on handling and firmness.